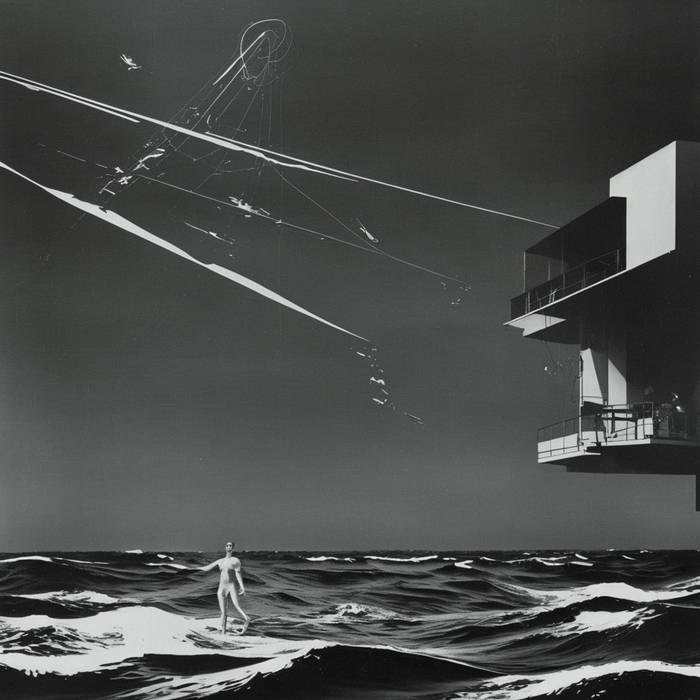
Taken on a small group of Islands in the Oslo fjord, called Hvasser. A 15 meter peice of fabric playing in the wind, scanned right to left in 21 seconds. Got really lucky with the clouds this time, allowing a single beam of sunlight in as a highlight.
I mean this in the most positive way… I don’t believe you until you can show us how you did it
The image is lovely, but easily faked. I’ve been taking photographs with weird things for years and I still can’t get my head around this.
Show and tell and you have my adoration.
I’ll wait
Edit:
"> For sure.
It’s a canon Lide 30 scanner at its core. You have to remove the light source (a tiny RGB LED) and a pinhole array from the front of the sensor. Then I used a dremel to widen the slit the sensor looks through, to deal with some pretty severe vignetting. The optical assembly is made from foam board, gaffers tape and an acrylic lens liberated from a regular magnifying glass. I use a software called VueScan to perform the actual scan."
Yeah. That’s pretty cool. Have the adoration you crafty fox.
Hey, thanks!
I get you, the guy at the print-shop I use has asked me several times if my art is artificially generated.
I don’t know what you expect as evidence, but I’ll try.
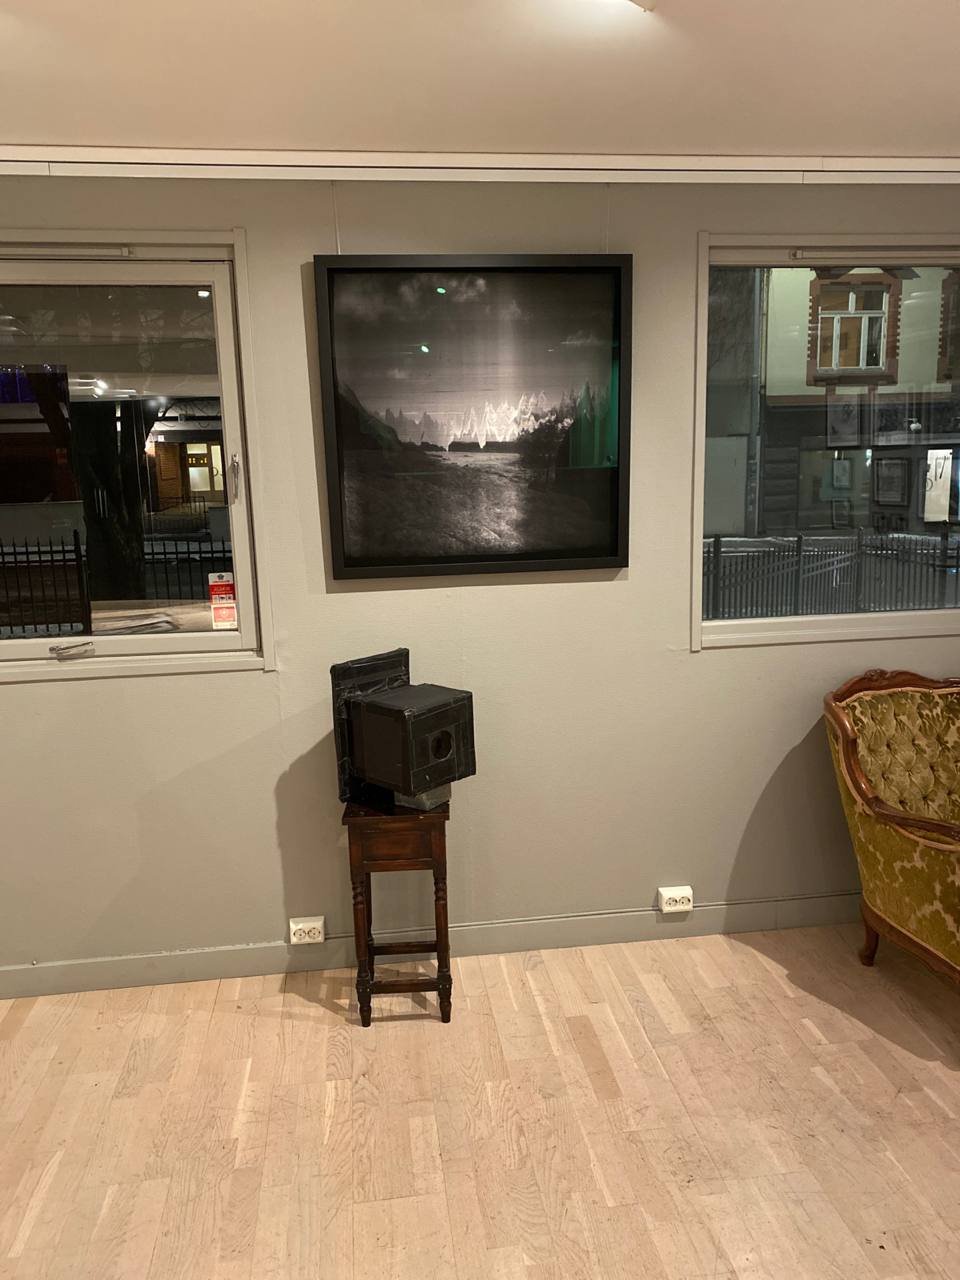
This is a picture from my last exhibition, and the box there is the scanner-camera.
The fabric is 15 meters by 145cm, I have friends holding it stretched out of frame at both sides.

This is another shot from the same shoot. I think it’s very dynamic, but I like the ‘sunbeam’ from the original post better.
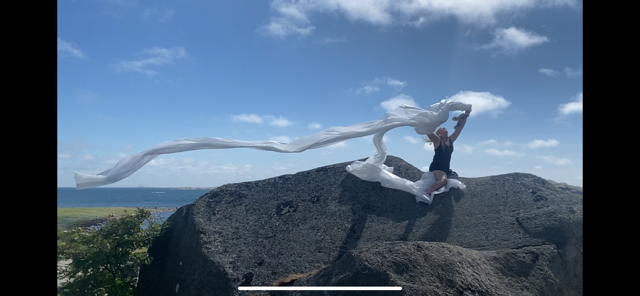
And this is a still from a video I took of my friend playing around With the fabric in the wind before she jumped down from the boulder I made her stand on in order to get the original shot.
I hope that covers it. The wavy pattern is due to the linear sampling of the scanner, and the play of motion over time.
Oh man, I thought that wavy pattern was somehow mountains, given that you were at the fjords, not the fabric. This whole image is incredible, fantastically done!
What OP did was produce a functioning scanning back camera out of a pile of junk, which is definitely an achievement that deserves some props.
These types of mechanisms were more popular in the 90’s and early 2000’s before we’d nailed the ability to produce high resolution image sensors. Using quite rudimentary existing technology you can generate massive high pixel count images provided, of course, that your subject matter has the decency to hold still. These types of things were used widely for high resolution product photography and landscape shots destined to be reprinted in large formats.
Thanks for the explanation!
I can imagine a focused lens projecting onto a white sheet on the scanner bed, then scanned. Pretty neat imo
The image is projected directly onto the scanner’s sensor. Using a ground glass plate would also work, but is not necessary for my technique.
It’s a delightful image, I love the texture, and the the technique is innovative.
Thanks!
(However, I like your idea, that seems like a cool way to make pictures)
deleted by creator
That’s pretty amazing. Any more info on how the camera was built?
For sure.
It’s a canon Lide 30 scanner at its core. You have to remove the light source (a tiny RGB LED) and a pinhole array from the front of the sensor. Then I used a dremel to widen the slit the sensor looks through, to deal with some pretty severe vignetting. The optical assembly is made from foam board, gaffers tape and an acrylic lens liberated from a regular magnifying glass. I use a software called VueScan to perform the actual scan.
I’ve used and supported VueScan for years. And have a crappy old scanner that I have no other use for. What you did here is amazing. Bravo! I may attempt it some time soon . Super Nifty!
Thanks! The build isn’t really that complicated, a Saturday is enough time to make your very own camera.
Be warned though, I tried to make this with the newer Lide 210 and 220 scanners, and I haven’t gotten them to work right, I think there’s some smart circuits in there that ‘corrects’ away the photographic abilities.
This looks like a scene from a late 50s fantasy movie.
I could see this in a Jodorowsky film
This is fantastic.
I first thought “what a weird mountains did the scanner produce”. But then I read your text and it makes it even better. This is almost like art, it really makes you investigate and create your own story around it.
“Almost like art”, you “kill him with your faint praise.”, to quote some author. lol
You make it sound so negative, lol . I meant it in a good way. It probably is art, but I’m not knowledgable enough to be the judge of that.
Thanks!
I try to make art, almost getting there is encouraging :)
That is so impressionistic. It’s beautiful. Can you explain how you modded a scanner for this?
Thank you! I’ve explained the build in another comment under this post.
I’d love to see what your setup looks like and how much trial and error an image takes to make.
This is unbelievably cool and unique, big plus for using a moving subject.
I posted a picture of the camera in response to another comment, it looks a bit unimpressive, but it’s mine and I love it.
It’s anything but unimpressive (the image or the camera!)
I muck around with astrophotography and have produced some hideous images, that I was ecstatic with because of the effort required to produce them and actually landing a result. And the tangle of wires and mismatched adapters are all part of it, even if it looks like an abomination 😅.
If anything, I find it super interesting, and it inspires me to give something similar a go!
Why is it called “drake”? There aren’t any underage girls in the pic.
Drake is an older/less used form of Drage, which is a Norwegian word that means both kite and dragon. And the V is because it’s the fifth one in a series I’m working on. I didn’t realize the connection to the artist at all before you pointed it out…
Post some stuff in the shitty camera challenge! They’d love this
Gosh, this is practically audible! It hits some wonderful centers in my brain - your methods, efforts, and the further information you posted give that much more to appreciate. Thank you for sharing!
I love it, thanks for sharing! You chose the better frame as well!
I love your post, I’ve been thinking of ways to capture images from large format lenses, and you inspired me to start experimenting with flatbed scanners.
I’m using a Canon N 650U because I had one lying around. I haven’t modified it, so the light source still exists.
I’m genuinely surprised how easy it is to get an image. I experimented by putting the scanner directly under the ceiling light in my kitchen, and I can hold the lens over the flatbed and see the image forming well enough that I can get it into focus. Then just hit the scan button and tada, one image of a ceiling lamp. I didn’t need to dismantle the scanner, or use a gg screen or anything. It just works with the scanner and the lens.
Since then I’ve rigged up a system to hold the lens in place, and a slider to move it up and down to focus. And I drape a cloth over everything to keep stray light off the sensor.
Exposure is difficult. My large format lenses don’t have any aperture control, so I either have to build one, or use an ND filter. Or if I don’t have enough light, I add more continuous light sources.
I saw your comment about vignetting, but I didn’t understand it at the time. I’ve mostly been experimenting with a lens that creates a 100mm image circle, and it works fine. But with another lens, I’ve just tried to scan the entire A4 surface, and the corners are black with a small image in the centre, even though I can peer under the curtain and see a nice bright image from the lens that covers the whole flatbed. I concluded that the sensor will only accept light from one direction, and can’t see light arriving from an angle. So, yeah I’m considering surgery to fix the aperture slit in front of the sensor. I don’t really know what to expect when I open it up. Did you find it easy to remove and modify? Can you offer any advice before I get elbow deep in scanner parts?
Also, my images all come out in black and white, which is weird. Objects sitting on the glass come out in colour, but the image formed by the lens scans in black and white only.
The whole rig is too heavy to pick up right now, so I mounted a little mirror on top, so I can point it anywhere, lol.
Thank you!
The n650u looks very similar to the lide 30, so I’ll assume that it’s more or less the same inside.
The sensor assembly is fairly straightforward. A plastic housing that gets pulled by a cord. Once you liberate the assembly from its track/cord/whatever is holding it and moving it around, you get to the good part.
The sensor itself, and the RGB LED that supplies the light is on a PCB that’s mounted to the plastic carriage from the underside, it’s held together by plastic tabs (it’s a few years since I did this, so the details might be off, but it wasn’t a difficult task). Use a sharp utility knife to cut the tabs and remove the sensor PCB. I’ve used strips of gaffers tape to put it all together again. The LED looks like a small white rectangle stood perpendicuar to the PCB, I simply broke it off. This makes the canon drivers throw an error, but VueScan doesn’t care. If you’re squeamish about actively destroying your scanner, you can probably figure out a way to cover it up with some tape or foil.
The circular vignetting you’re seeing is due to the pinhole array, it’s a thin black plastic strip with a bunch of tiny holes set in front of a slit, just rip it off, its either glued or welded in place, but I’ve never had a problem getting it out with some pliers. While you’re messing about in that area, get rid of the prism that spreads the light from LED as well, it probably won’t do much of anything if left in, but it feels better to remove it.
Once you run the camera in this state, you will discover that you get uneven exposure from edge to edge, a linear vignette perpendicular to the axis which the sensor moves. This happens because the plastic housing of the sensor is throwing shade. So use any available abrasive machine, and cut that housing down to its essential functions of holding the sensor in its place, and as a pressure against the glass plate.
Unfortunately I don’t have any large format lenses around, so I’ve stuck a magnifying glass to the front of my camera (you know, gotta keep it punk rock), but the way I handle aperture is by cutting holes into black cardboard (very thin cardboard) at about the size I think will work, and taping the hole across the lens. One of my goals with this project is to try make photography into a tactile, direct and intuitive process so I try to avoid unnecessary machinery.
The reason you’re only getting grayscale is due to how a CIS scanner renders color. During a normal scan, the RGB LED only flashes one channel at a time, and the driver figures out if it’s looking at the red, green or blue signal all by itself, and at the end it interpolates the data to render a full color image file for you to enjoy. I’ve been playing around with the idea of tapping the signal path and use it to trigger an external RGB lighting rig in a studio, to get full color images of models. But so far it’s only a funny thought!
And lastly, the sensor is exceptionally sensitive to infrared light, to the point that the heat from the internal electronics of the scanner causes streaking. I’m using a few pieces of carefully placed aluminum foil to shield the sensor in select areas, and that reduces the issue to a tolerable amount.
Good luck on your build! This project has given me a boatload of insights into both photography, electronics and computing, and I hope you will have a similarly awesome journey.
Edit: im happy to answer any further questions you might have. it would be awesome to see some shots once you get the contraption up and running!
Wow, that is all very valuable information, thank you. I feel a lot more confident attempting the surgery on the electronics now.
I had a thought about going from bw to colour. If should be possible to capture the same scene 3 times, each time with a different colour filter in front of the lens. Then merge the 3 images together as colour channels in Photoshop or similar. The filters will reduce the amount of light picked up by the sensor, which will help a bit on bright sunny days, but will require more light in a studio. Also, in a low light situation, it could be possible to capture a fourth scan with no filter, and use it for brightness information. I’m not exactly sure how to do that, but I know some cellphones use that trick.
Edit: But I also like your idea of tapping the signal to trigger external lighting.
Cathode ray dude on YouTube just dropped a feature length video on scanners, you might find it interesting!
What you are describing is known as a harris shutter, which would be awesome to explore, especially considering the weird way motion is captured on one of these devices.
I don’t think a separate brightness channel is entirely necessary. But if you want to go down that path, I’d start trying out the blending modes in photoshop. There’s probably also some method for taking your RGB composite, and bring it into a colorspace that has a separate channel for brightness, and then replace that channel with your b/w pass. Lab color space should allow you to do this, although I’m not really sure what software to use, or if theres some way of doing This directly in Photoshop.
That’s really fucking cool!!
Looks like a black and white version of an ocular migraine.
Dooooopeee
Thanks! Is that a Deus Ex ref in your username? In that case, double thanks!


